
Tuna iOS SDK#
The Tuna SDK for Apple's platforms will allow you to start a payment session, store credit cards, and generate tokens for payment through your backend. In this section, you will find all details needed to configure and use the Tuna's iOS SDK in your app.
Getting started: Configuration#
The Tuna iOS SDK is available as a Swift package. You can add it to your Xcode project by going to:
File > Swift Packages > Add Package Dependency
You can also integrate it directly by editing your Package.swift file:
1let package = Package(
2    ...
3    dependencies: [
4    .package(url: "https://github.com/tuna-software/ios-sdk.git", from: "0.1.0")
5    ],
6 ...
7)
CocoaPods#
Support for CocoaPods is coming soon.
Usage#
Initializing the SDK#
It must be done early in your app's lifecycle.
For example, in your app delegate's application:didFinishLaunchingWithOptions callback.
The usage of the iOS SDK requires an AppToken located in your Account Settings section of your Console in the Developer tab.
note
Don't you have a Tuna Account? Click here to start your registration at Tuna.
Swift#
1import UIKit
2import Tuna
3@main
4class AppDelegate: UIResponder, UIApplicationDelegate {
5func application(_ application: UIApplication, didFinishLaunchingWithOptions launchOptions: [UIApplication.LaunchOptionsKey: Any]?)        Bool {
6TunaSDK.configure(appToken: "<your Tuna AppToken>")
7
8// ...
9
10return true
11}
12
13// ...1@import Tuna;
2
3@implementation AppDelegate
4
5
6- (BOOL)application:(UIApplication *)application didFinishLaunchingWithOptions:(NSDictionary *)launchOptions {
7 [TunaSDK configureWithAppToken:@"your Tuna AppToken" sandbox:YES];
8
9 return YES;
10}
Tuna session#
Every interaction with the Tuna APIs happens within a session. Therefore, you must provide a session ID obtained from Tuna to initialize the SDK. This session ID must be negotiated between your server and Tuna's servers for security reasons.
A session initialization looks like this:
- Your app sends a request to your backend;
- Your backend talks to Tuna's servers to generate a new session ID for the customer;
- Tuna's servers send the newly generated session ID to your backend;
- Your backend responds to your app with the new session ID;
- Your app calls the Tuna SDK to set the current session ID.
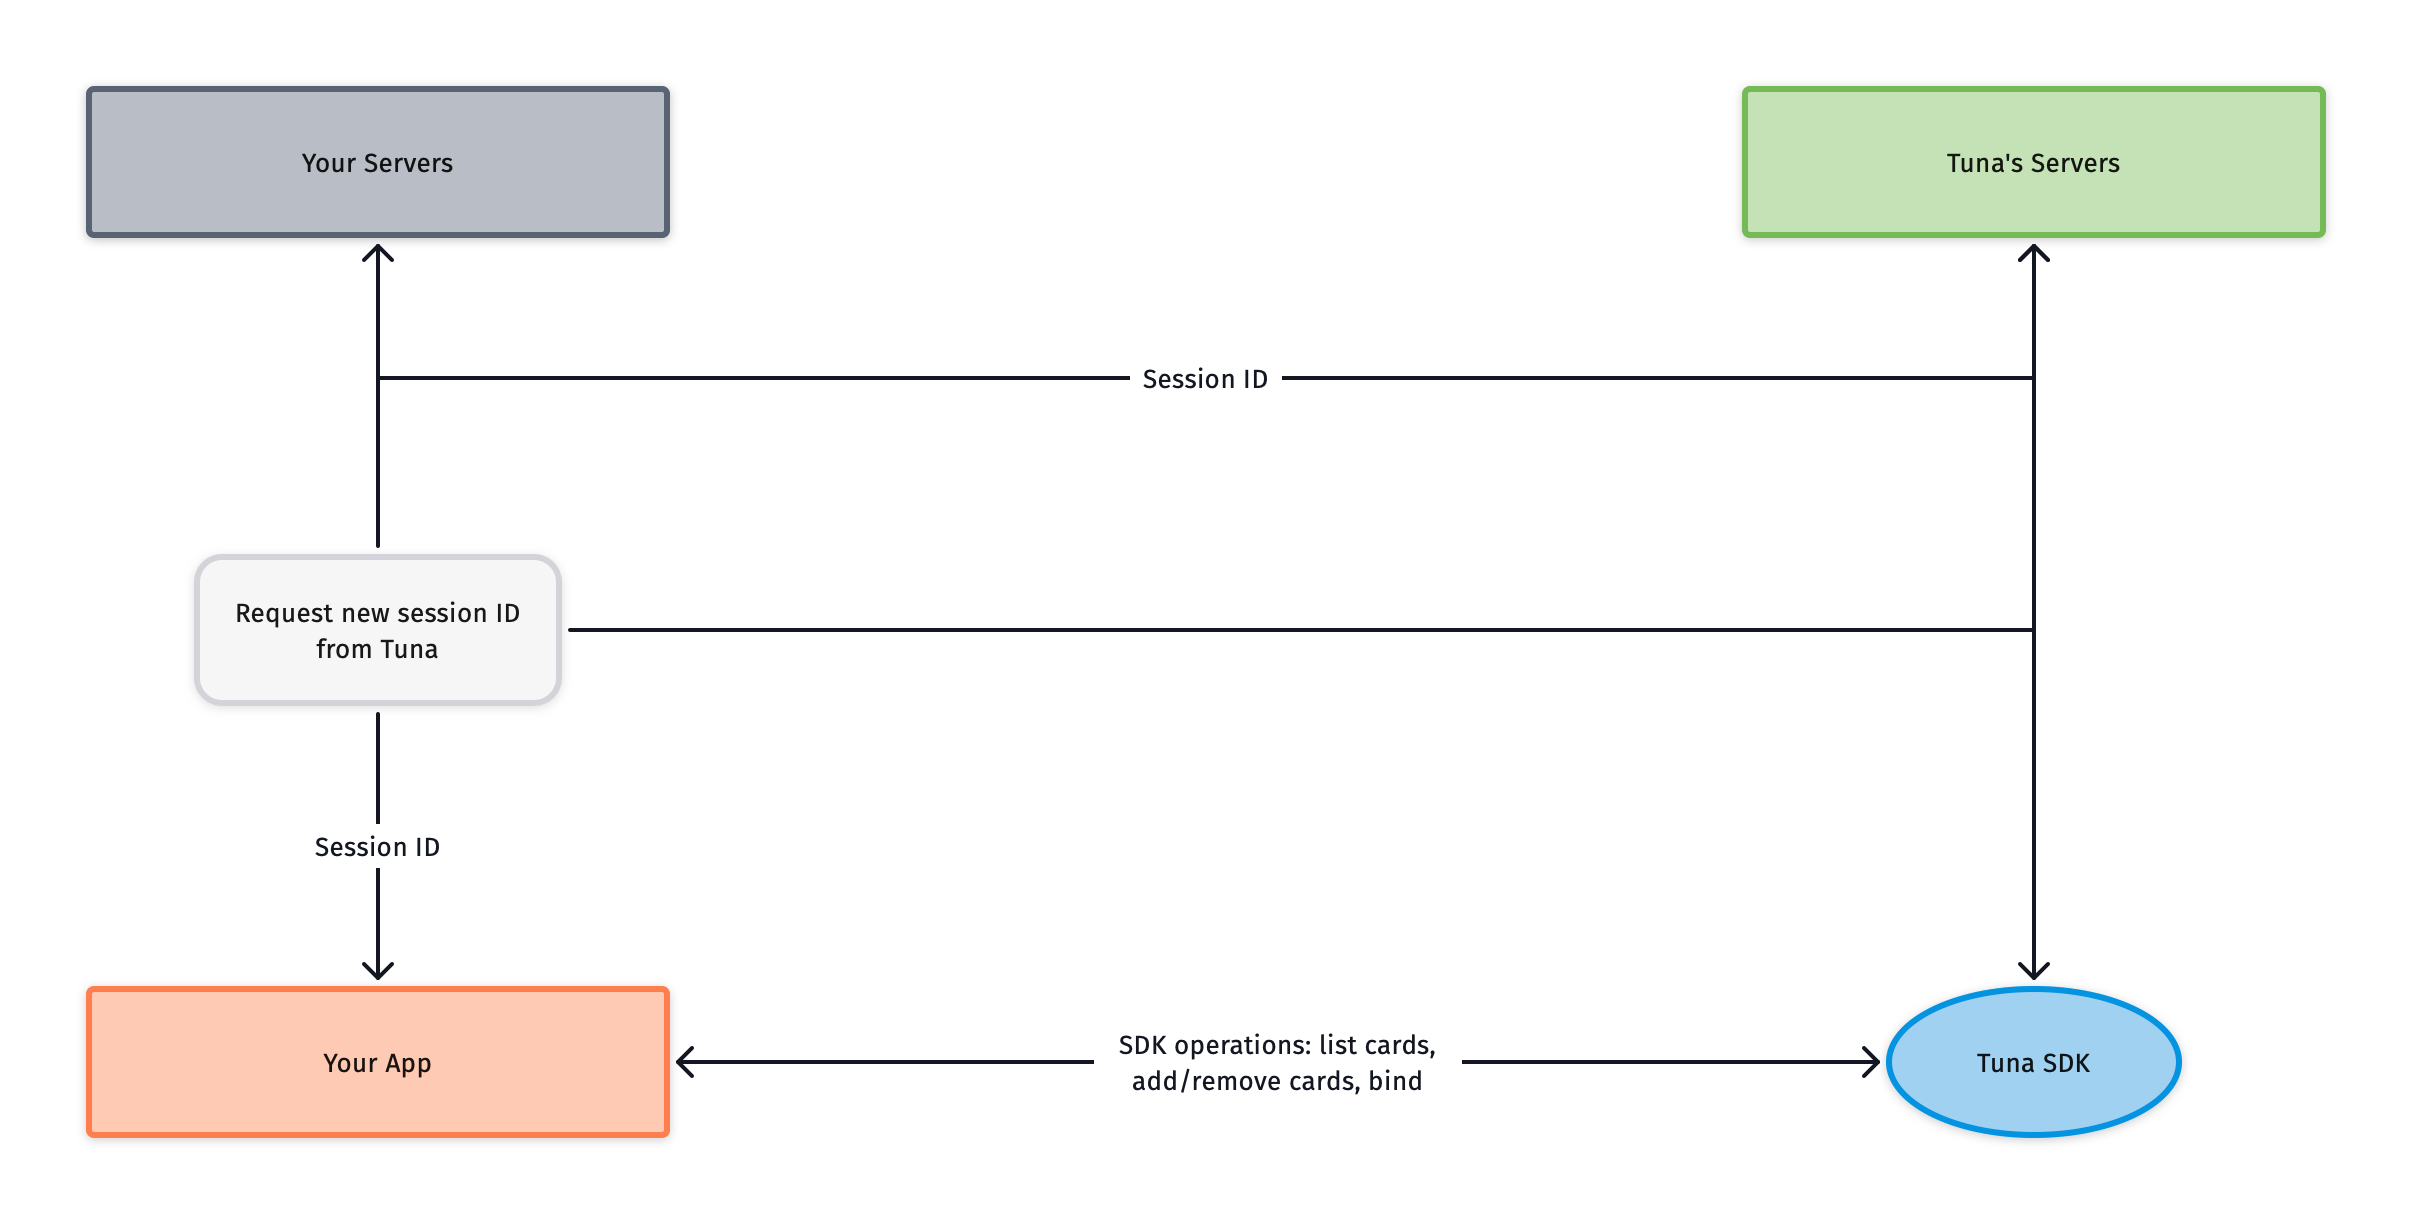
You do not have to start a session on your app launch. A good trigger to start the session is, for example, when the customer starts your checkout flow.
1import Tuna
2
3// ...
4
5func startTunaSession() {
6// Method that calls your API service.
7MyAPI.generateSessionID(...) { result in
8    switch result {
9    case .success(let newSessionID):
10    // Set the new session ID on TunaSDK after obtaining it from your servers.
11    TunaSDK.sessionID = newSessionID
12    case .failure(let error):
13    // ...
14}
15}
16}
Adding a new card#
Use the addNewCard method to add a new card to the customer's account. This method takes the credit card information: number, holder name, expiration
month and year, the CVV (optional), and a save parameter. If the save parameter is true, the card will be saved and retrieved in the future when
the same customer logs in. If not, it can only be used within the current session.
The CVV parameter should be used when creating a card that will be used immediately. If the card is only used later, you can save it without the CVV, then
use bind later to get a usable token.
1[TunaSDK addNewCardWithNumber:@"card number goes here"
2cardHolderName:@"cardholder name goes here"
3expirationMonth:1 // expiration month, int from 1 to 12
4expirationYear:21 // expiration year, two digits
5           cvv:nil
6          save:YES
7    completion:^(TunaCard *newCard, TunaSDKError *error)
8{
9if (error) {
10// Something went wrong
11} else {
12// All good
13}
14}];
Binding a saved card with CVV#
1[TunaSDK bindCard:card cvv:@"card CVV input by the user goes here" completion:^(TunaCard *card, TunaSDKError *error) {
2    if (error) {
3        // Something went wrong
4    } else {
5        // Ready to make money
6    }
7}];
What's next?#
Once you have your account and your integration concluded, you can start the setup up of your connections and flows in Console. For further details, please check out the Console section.