tuna.js Library#
The Tuna JavaScript libraries will allow you to tokenize customer information, collect sensitive card data and accept payments on your website. In this section, you will find all details, features and configurations to run these libraries at your web page.
To start using Tuna JavaScript library is as easy as including the tuna.js file in your checkout page. It is highly recommended that you do not store the js file at your server, for security reasons.
It can also be added to your Node.js project with the npm package, which supports both JavaScript and TypeScript.
Integration methods#
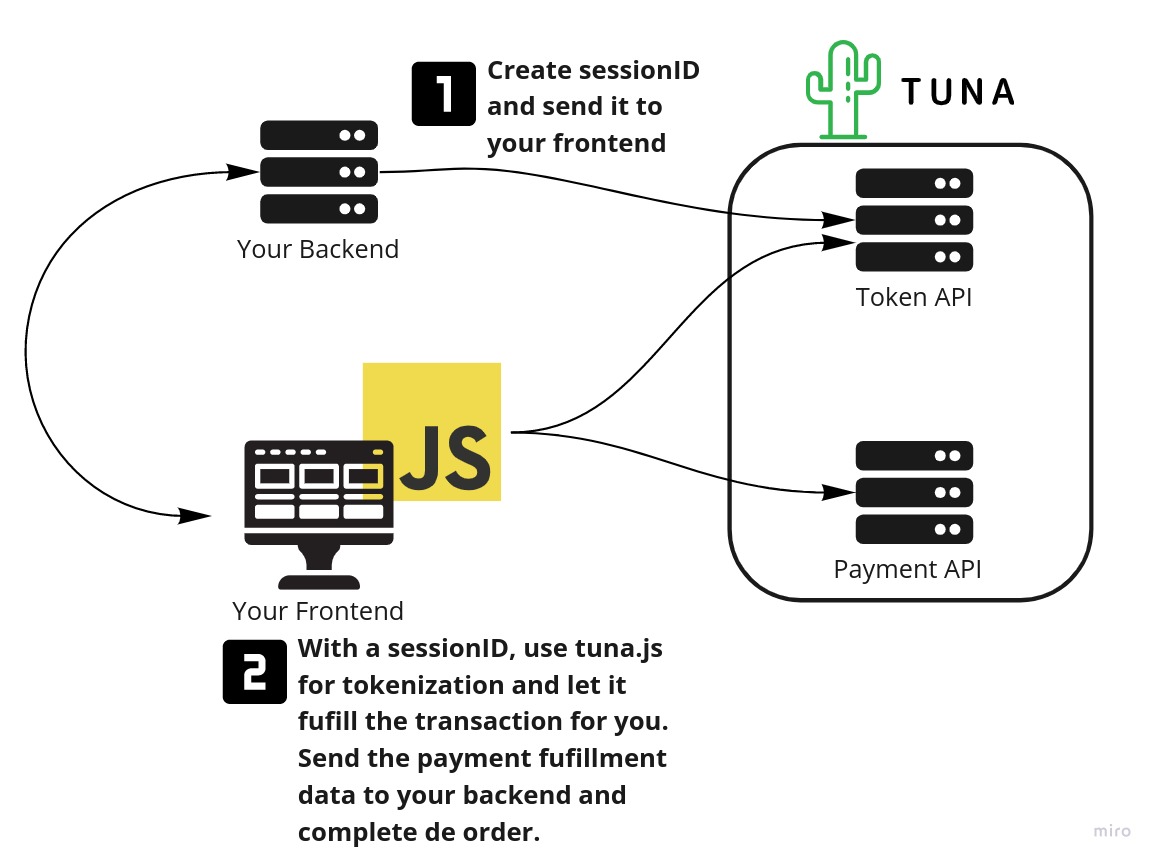
You can choose between using tuna.js to generate a complete payment form with tokenization and payment in a transparent way, or you can use it to just render the form and take care of tokenization while handling the payment API calls yourself at your backend system.
Optionally you can use tuna.js solely to handle tokenization(in that case you need to be carefull not to send sensitive credit card data to your backend).
When you create a sessionID on your backend, you can choose to associate this session with just customer data or customer + order.
This choice will vary according to the type of integration you'll use to connect to our Payment API, which can be either through backend or using Tuna JS.
When your backend places the payment API calls#
Here you only need to send customer data when creating the sessionID.
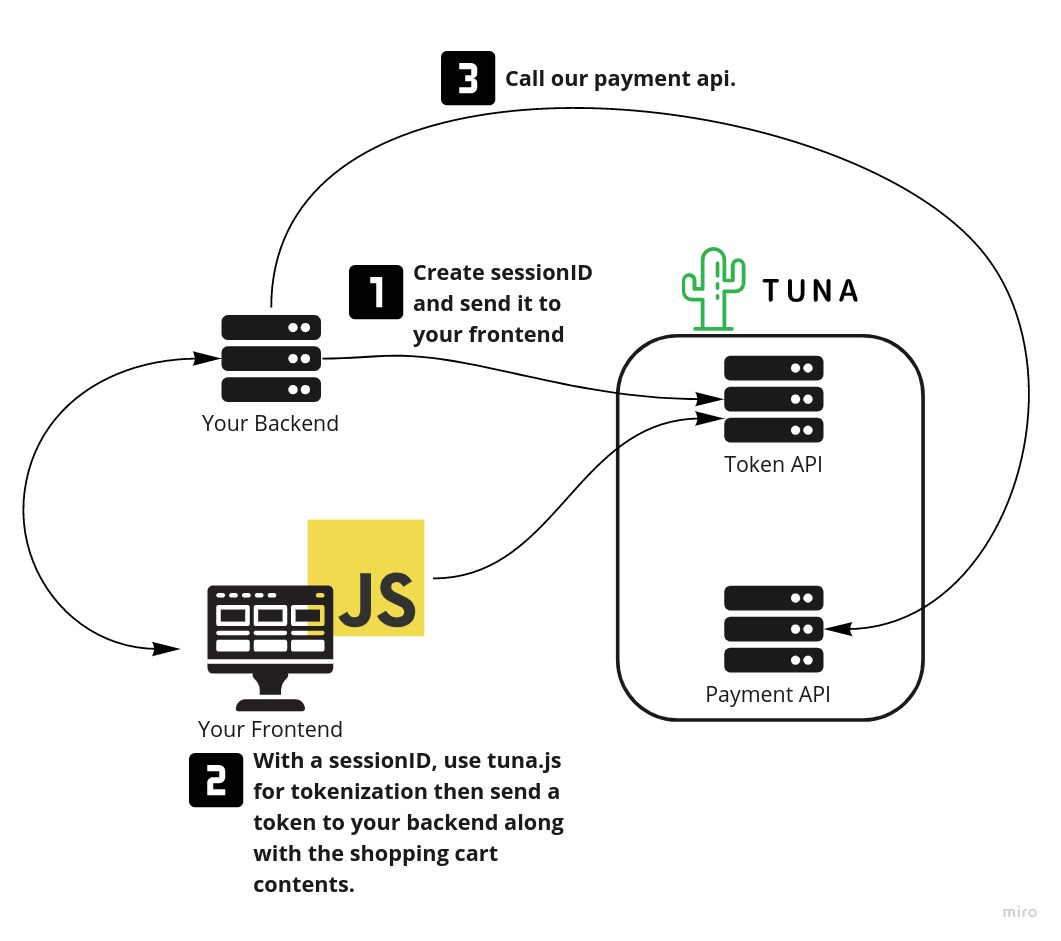
When tuna.js places the payment API calls#
Here the sessionID must have been generated including the order identifier.
Keep in mind that since the payment is done before submitting the order to your backend, you must check that the order total matches with the total paid amount by either using a webhook or polling the payment status.
Getting started: Adding tuna.js#
You can choose to use tuna.js to create a brand new checkout page or to link your checkout with Tuna connections. Below you'll see how to do the second option. To use the tuna.js to create a new checkout page and enjoy all facilities we provide, check it out here.
<script src="https://js.tuna.uy/tuna-essentials.js"></script>
tuna.js V2
<script src="https://storage.googleapis.com/tuna-statics/tuna-v2.js"></script>
tuna.js V2 CSS file
<link rel="stylesheet" type="text/css" href="https://storage.googleapis.com/tuna-statics/components.min.css">
Initializing Tuna#
Use the session ID generated by you backend to start Tuna.
Tuna (sessionID, env?, antifraudConfig?, integrateWithClickToPay?)
Call this method to initiate Tuna before performing any actions.
Method parameters
sessionIDstringREQUIRED
The
sessionID is the public key you got using your personal data through
Tuna Token API.envstringOPTIONALDEFAULT:"production"
The environment name. Set env="sandbox" to use the sandbox environment of all related Tuna APIs
antifraudConfigarrayOPTIONALDEFAULT:null
An array of { key, value } object containing parameters to fill the antif-raud scripts.
Use keys with only lowercase alphanumeric characters
integrateWithClickToPayboolOPTIONALDEFAULT:undefined
An flag to indicate if tuna.js should interact with Click to Pay methods
Returns
object
The instance of Tuna object.
Configuring antifrauds#
Injects at the page the data collection scripts of all antifrauds providers linked to your Tuna account.
You should use the antifraudConfig parameter at Tuna initialization to provide the following information about the customer session for each anti-fraud provider you use.
| ClearSale | SiftScience | Konduto | CyberSource |
|---|
| sessionid | userid, sessionid | customerid | sessionid |
Aditionally, you need to choose wich antifraud scripts you will inject. Do that by adding a another { key, value } object using the antifraud name as key and the antifraud public key as value. Look to the example bellow:
const tuna = Tuna(sessionId, [
{ key: "sessionid", value: "6de61205-00ad-4068-b8bd-25a12ab9b305" },
{ key: "customerid", value: "321" },
{ key: "konduto", value: "konduto_key" },
{ key: "cybersource", value: "cybersource_key" },
]);
In the example above, were filled the requirements to inject the data collection scripts of Konduto and CyberSource antifraud
Initializing Click to Pay#
Before using Click to Pay methods, you need to initialize the Click to Pay service. This method must be called before any other Click to Pay operations.
async initClickToPay ()
Initialize the Click to Pay service. This method must be called before using any Click to Pay functionality.
Returns
object
The initialization response from Click to Pay service.
Authenticating with Click to Pay#
Use this method to authenticate a user with Click to Pay using their email address or mobile phone number.
async authenticateWithClickToPay (params)
Authenticate a user with Click to Pay service.
Method parameters
paramsobjectREQUIRED
The authentication parameters object.
Returns
object
The authentication response from Click to Pay service.
Accessing the Tuna tokenization connection#
Use the Tuna tokenization connection through the tuna.js library to create PCI compliant card tokens.
const tuna = Tuna(sessionId);
const tokenizator = tuna.tokenizator();
async tokenizator.list ()
List saved card tokens to the given customer session ID.
Returns
object
The operation response is described
here.
async tokenizator.generate (cardData)
Create a new credit card token entry
Method parameters
cardDataobjectREQUIRED
Object containing the credit card data to be tokenized.
Returns
object
The operation response is described
here.
async tokenizator.delete (token)
Delete an already created card token.
Method parameters
tokenstringREQUIRED
The token associated to the credit card.
Returns
object
The operation response is described
here.
async tokenizator.bind (token, cvv)
Binds a CVV with a token.
Method parameters
tokenstringREQUIRED
The token associated to the credit card.
Returns
object
The operation response is described
here.
async tokenizator.encryptClickToPayCard (cardData)
Encrypt card data for Click to Pay transactions. This method encrypts the card information before it can be used with Click to Pay checkout.
Method parameters
cardDataobjectREQUIRED
Object containing the card data to be encrypted.
async tokenizator.checkoutWithClickToPayCard (srcDigitalCardId)
Perform checkout with a saved Click to Pay card.
Method parameters
srcDigitalCardIdstringREQUIRED
The unique identifier for the digital card in the SRC network.
Returns
object
The checkout response object containing both the checkout data and Click to Pay specific information.
async tokenizator.checkoutWithClickToPayNewCard (encryptCardResponse, consumer)
Perform checkout with a new Click to Pay card.
Method parameters
encryptCardResponseobjectREQUIRED
The encrypted card response object from Click to Pay.
consumerobjectREQUIRED
The consumer information object.
Returns
object
The checkout response object containing both the checkout data and Click to Pay specific information.
The details of the Token API request objects and responses can be access at the this link.
Paying with Tuna#
As described at integration methods section, is possible to proccess payments direct from your front end. Below there are described all methods you should use to do that.
async getCheckoutData (creditCardData, resultCallback?)
Transform the raw card data in an object containing all necessary to proccess the payment using tuna.js
Method parameters
creditCardDataobjectREQUIRED
The credit card data object.
resultCallbackfunctionOPTIONAL
The callback function that should be called at the end of the proccess receiveing the checkout data object as parameter.
Returns
object
The operation response. The function only return a value if the resultCallback parameter wasn't supplied.
async pay (paymentMethodType, totalPaymentAmount, paymentMethodAmount, checkoutData?, customer?)
Execute payment
Method parameters
paymentMethodTypestringREQUIRED
The payment method type name. Could be 'creditCard', 'pix', 'crypto' or 'banckInvoice'.
totalPaymentAmountnumberREQUIRED
paymentMethodAmountnumberREQUIRED
The amount to use with this payment method
checkoutDataobjectOPTIONAL
The data used to fill the checkout request. Used only to 'creditCard' payment method. Can be obtained by using the
getCheckoutData methodcustomerobjectOPTIONAL
Customer data to be sent to the Tuna payment engine. More details
hereReturns
object
The operation response is described
here.
async doStatusLongPolling (callbackFunction, methodID, paymentKey)
Implementation of a long polling strategy to check if the payment was approved or not. Ideal to be used with asynchronous payment as with PIX.
Method parameters
callbackFunctionfunctionREQUIRED
The callback function that should be called when .
Returns
object
This object is sent by callback through callbackFunction parameter.
Using tuna.js to build a checkout form#
The tuna.js provides a set of tools to create a checkout page from scrath. You can use tuna.js to help you to create and manage each field of your checkout form or use only few lines of code to use a predefined checkout form template.
With this build of tuna.js you will also be able to access 3DS helper methods
<script src="https://storage.googleapis.com/tuna-statics/tuna-v2.js"></script>
You can choose whether to use your own style sheet or ours. To use ours, include the .css file at your page.
<script src="https://js.tuna.uy/css/components.min.css"></script>
This build includes all methods of the
essentials build.
Using the default payment form#
This method allows you to integrate with Tuna tokenization connection using the default payment fields, and it also includes the input validations configured. Look below the entire configuration of this method.
const tuna = Tuna('JfMf8kKoMkdXVtM5Df8J5LbU=');
tuna.forgeDefaultForm("#root", { checkoutCallback : response => console.log(response) });
Additionally, each component and area of the default form could be customized to attend to your necessities. Look at piece type section to see how set the options for each component.
const tuna = Tuna('JfMf8kKoMkdXVtM5Df8J5LbU=');
tuna.forgeDefaultForm("#root",
{
savedCardBoxTitle: "Saved cards",
savedCardButtonTitle: "Use saved card",
newCardBoxTitle: "New card",
newCardButtonTitle: "Use new card",
button: { title: "Pay with TUNA!" },
cardHolderName: { title: "Card holder name", placeholder: "As it is written on the card" },
cardValidity: { title: "Validity", validationMessage: "Use a valid card validity", placeholder: "mm/yyyy" },
cardCvv: { title: "CVV", validationMessage: "Insert a CVV", placeholder: "000" },
saveCard: { title: "Save card to future purchases" },
cardList: { title: "Saved card", cardCvv: { placeholder: "cvv" } },
cardNumber: { title: "Card number", placeholder: "0000 0000 0000 0000" },
installment: {
title: "Installment", options: [
{ key: 1, value: "1x interest-free" },
{ key: 2, value: "2x interest-free" },
{ key: 3, value: "3x interest-free" },
{ key: 4, value: "4x interest-free" },
{ key: 5, value: "5x interest-free" },
]
},
checkoutCallback : response => console.log(response)
}
);
To give flexibility to the default form, is also possible to create a custom input area. It is usefull if is necessary to collect a additional data from the customer direct at payment form.
CustomAreas
Array of custom areas
titlestringREQUIRED
The title of the custom area
resultingObjectstring
Name of the object that will contain the values gatted from the fields
fieldsobjectREQUIRED
Object describing each
piece type of the custom area. Define the piece using its name (e.g., 'document') as the property name and the options object to customize the component
forgeDefaultForm (place, options)
Call this method to create the default Tuna form to acquire the customer's credit card data and perform the checkout.
Method parameters
placestringREQUIRED
The selector that identify the container where the form will be placed.
optionsobjectREQUIRED
The options to customize the form as well all elements used to compose then. Except the document option, none of the other pieces needs to be mandatorily configured. They will use default values when the configuration was not given.
getBuyerDocumentFormatter (locale?)
This method lookup by BuyerDocumentFormatter implementations related to the locale sent.
Method parameters
localestringOPTIONAL
The locale key related to the payment origin country.
Returns
object
An instance of BuyerDocumentFormatter object related to the locale sent or the default instance of BuyerDocumentFormatter.
Extending the BuyerDocumentFormatter class#
The tuna.js exports a class named BuyerDocumentFormatter. Use this class to extend the suport to any document format and validation rules. See bellow an extension example to support Brazilian CPF (Individual Registration).
BuyerDocumentFormatter
patternstringREQUIRED
The document pattern
validationFunctionfunctionREQUIRED
Function used to validate the input value
documentNamestringREQUIRED
The name of the document (used as field label)
Using the Piece Manager#
The Piece Manager is the object responsible to create, configure and manage the UI elements. You can use it to forge interface pieces as inputs, checkboxes and other elements.
tuna.pieceManager ()
Create the PieceManager instance.
Returns
object
The pieceManager instance.
pieceManager.forge (place, pieceName, options?, group?, propertyName?, validationFunction?)
Create the UI elements.
Method parameters
placestringREQUIRED
The selector that identify the container element where the piece will be placed.
optionsobjectOPTIONAL
The specific piece options for the chosen piece. When null, a empty options object will be used.
groupstringOPTIONALDEFAULT:"default"
The component's group name.
propertyNamestringOPTIONAL
The name of the property at the returned object.
Each piece has its own default name. Use this parameter only when the intention was override the default name or when using the following piece types:
formattedInput,
input.
validationFunctionfunctionOPTIONAL
Returns
int
The internal ID of the generated piece.
pieceManager.destroy (pieceID)
Remove the UI element from the screen
Method parameters
pieceIDintREQUIRED
The ID of the piece returned when the piece was forged.
pieceManager.executeOnPieces (function)
Receives a function and apply it to each created piece
Method parameters
functionfunctionREQUIRED
A function to run with each created piece
pieceManager.getPiece (pieceID)
Return the piece
Method parameters
pieceIDintREQUIRED
The ID of the piece returned when the piece was forged.
Returns
piece
The instance of piece with the given pieceID or null
pieceManager.getPiecesByGroup (groupName)
Retrieve an array of pieces inside the group
Method parameters
groupNamestringREQUIRED
The group name used to forge the piece
Returns
array
The array containing all pieces of the given group name
pieceManager.changeGroupEnableStatus (group, enabled)
Change the status (enabled/disabled) of all components at the given group. Once disabled, the UI elements will not be considered to the checkout proccess and the validation functions will not be triggered.
Method parameters
enabledboolREQUIRED
The enable/disable status to be setted at each group element
pieceManager.destroyGroup (group, preserveRoot)
Destroy all elements of the given group.
Method parameters
preserveRootboolREQUIRED
Flag to choose if the root element should be preserved or not when destroying the element.
The Piece object#
The piece class define each type of code pieces that the tuna.js can create and manage as well provide a set of functions to interact with this pieces.
piece.getId ()
Return the piece ID generated when the piece is forged
piece.getPlace ()
Return the seletor used when the piece is forged
piece.getGroup ()
Return the group name used when the piece is forged
piece.getPropertyName ()
Returns the property name used to the field value when the checkout is processed. This property are default in some piece types like cardCvv but can be setted or overridden.
piece.getOptions ()
Returns the piece options
piece.getType ()
Returns the piece type definition.
Returns
object
This object contains a set of properties used to generate the respective piece. The properties can vary according the piece type.
piece.getOptions ()
Returns the piece options
Returns
array
The piece options passed when the piece was forged.
piece.getValidationFunction ()
Returns the piece validation function
Returns
function
The validation function passed when the piece was forged.
piece.clear ()
Clear the piece value.
piece.updateComponent ()
Update the component UI.
piece.unmountComponent (preserveRoot)
Unmount the component.
Method parameters
preserveRootboolREQUIRED
Flag to choose if the root component will be preserved or not
piece.setValue (value)
Set the value and update the component.
piece.markAsInvalid ()
Mark the piece as invalid showing the validation message and giving focus to the component
piece.resetInvalidMarking ()
Resets the invalid marking.
piece.getValue ()
Gets the field value. Additionally, verify if the field is invalid running the respective validation function, and if positive runs the markAsInvalid() function. If the field is identified as invalid, an expection will be throwed with code ERR:07.
Piece Types#
There are 13 different types of UI elements that should be used to create the payment form. Each element accept a set of properties that can be used to configure aspects as: field label, validation message, css classes and so on. You can see all pieces and their configurations bellow:
input
A simple input text.
titlestring
The title of the field.
titleClassstring
The CSS class used in the field title.
inputClassstring
The CSS class used in the input.
Show object properties
formattedInput
A customizable formatted input text.
patternstringREQUIRED
The pattern used to format the input: use "A" for letters and "9" for numbers. E.g. 999.999.999-99 for brazilian CPF (citizen identification number).
cleanMaskbool
A flag to set up if the inputted value will have the mask cleaned or not when returned.
titlestring
The title of the field.
Show object properties
document
A customizable input text to receive and validate the buyer document data. The input value will be returned in the document property.
cleanMaskbool
A flag to set up if the inputted value will have the mask cleaned or not when returned.
titlestring
The title of the field.
Show object properties
email
An email input text.
titlestring
The title of the field.
titleClassstring
The CSS class used in the field title.
inputClassstring
The CSS class used in the input.
Show object properties
button
A simple button that can be used to trigger the checkout process.
titlestring
The title of the button.
buttonClassstring
The CSS class used in the button.
iconClassstring
The CSS class used in the button icon.
Show object properties
cardHolderName
An input text already setted to keep the card holder name data. The input value will be returned in the cardHolderName property.
titlestring
The title of the field.
titleClassstring
The CSS class used in the field title.
inputClassstring
The CSS class used in the input.
Show object properties
cardNumber
A formatted input text already setted to keep and treat the credit card number. The input value will be returned in the cardNumber property.
showCardBrandbool
A flag to set or not the display of the credit card brand icon.
cardBrandClassstring
The css class name to use in the card brand icon.
titlestring
The title of the field.
Show object properties
cardCvv
A formatted input text already setted to keep and treat the credit card CVV. The input value will be returned in the CVV property.
showCVVImagebool
A flag to set or not the display of the CVV icon.
cvvImageClassstring
The css class name to use in the CVV icon.
titlestring
The title of the field.
Show object properties
cardValidity
A formatted input text already setted to keep and treat the credit card expiration containing the expiration month and year. The input value will be returned in the expirationMonth and expirationYear properties.
titlestring
The title of the field.
titleClassstring
The CSS class used in the field title.
inputClassstring
The CSS class used in the input.
Show object properties
month
A formatted select box already setted to keep the expiration month. The selected value will be returned in the expirationMonth property.
titlestring
The title of the field.
titleClassstring
The CSS class used in the field title.
inputClassstring
The CSS class used in the input.
year
A formatted select box already setted to keep the validity year. The selected value will be returned in the expirationYear property.
titlestring
The title of the field.
titleClassstring
The CSS class used in the field title.
inputClassstring
The CSS class used in the input.
installment
A formatted select box to render the installment options. The selected value will be returned in the selectedInstallmentKey property.
optionsarrayREQUIRED
An array of { key, value } object containing the allowed installment options.
titlestring
The title of the field.
titleClassstring
The CSS class used in the field title.
Show object properties
saveCard
A checkbox that allows the customer to save the card data for future transactions.
titlestring
The title of the field.
titleClassstring
The CSS class used in the field title.
checkedboolDEFAULT: true
The default state of the checkbox.
Show object properties
Adding saved card selector#
We strongly recommend the saveCard object to increase the conversion rate of your checkout page. By implementing it, you also need to include the Saved Card Selector, so your customers can choose the card that have already been saved directly in your checkout page.
async useSavedCardSelector (place, options?, group?)
Create the saved card selector component.
Method parameters
placestringREQUIRED
The selector that identify the container element where the piece will be placed.
optionsobjectOPTIONAL
The options to customize the component
groupstringOPTIONAL
The component's group name
Returns
int
The number of returned saved cards. If returns 0, then the component will not be rendered.
clearSavedCardSelector ()
Clean all data set in any saved card selector component. Including CVV and document numbers.
Using Google pay#
With Tuna you can use the Google Pay to create the credit card token.
useGooglePay (googlePaySettings)
Configure the Google Pay
Method parameters
googlePaySettingsobjectREQUIRED
Google Pay configuration object containing all necessary parameters.
Using Apple pay#
With Tuna you can use the Apple Pay to create the credit card token.
useApplePay (applePaySettings)
Configure the Apple Pay
Method parameters
applePaySettingsobjectREQUIRED
Apple Pay payment configuration properties.
Returns
bool
A flag indicating if the payment with Apple Pay is ready
Example of use#
var applePaySettings = {
buttom: {
selector: "#paymentDiv",
style: {
buttonStyle: "black",
type: "check-out",
locale: "pt-BR",
width: "10px",
height: "10px",
borderRadius: "10px",
padding: "10px",
boxSizing: "10px"
}
},
applePayCallback: applePayPayload =>
return finishPayment(applePayPayload)
},
cart: {
lineItems: [{
"label": "Product 1",
"amount": 2
}],
"total": {
"label": "Your cart in our store",
"amount": 2
}
}
};
const isApplePayReady = await tuna.useApplePay(applePaySettings);
if (isApplePayReady)
$("#applePayPaymentDiv").show();
Managing checkout#
async checkout (callbackFunction?, useClickToPay?)
Triggers the field validations and then compile the inputted data in order to generate the credit card token. This callback function parameter is optional, if not sent then the method will return the result as method response.
Method parameters
callbackFunctionfunctionOPTIONAL
useClickToPayboolOPTIONAL
Flag to define whether to tokenize with click to pay together with Tuna
Returns
object
An object containing the result of the credit card tokenization and all non sensible data obtained by the forged input pieces. The method will only return a value if the callbackFunction parameter wasn't sent.
async checkoutAndPay (paymentMethodType, totalPaymentAmount, paymentMethodAmount, callbackFunction, customer?)
Similar to
checkout method but follows with the payment effetivation
Method parameters
paymentMethodTypestringREQUIRED
The payment method type. Avaliable: "creditCard", "pix", "crypto" and "bankInvoice"
totalPaymentAmountdecimalREQUIRED
paymentMethodAmountdecimalREQUIRED
The amount that should be paid with this payment method
callbackFunctionfunctionREQUIRED
A function that will receive the payment response promisse. The response object format is described
herecustomerobjectOPTIONALDEFAULT:null
An object representing the customer data that will be passed to the payment API.
Returns
object
Return through the callbackFunction an object with following properties
Creating 3DS data collection frame#
After a susccessfully call to checkout method is possible that the resulting tokenData property has the authenticationInformation field filled with accessToken and deviceDataCollectionUrl. In this case, in order to allow the 3DS flow to work properly, is necessary to add the 3DS data collection frame to the page before call the payment API.
Call this method is only necessary if you plan to do the call to payment API through your backend, i.e., you will not use checkoutAndPay.
create3DSDataCollectionFrame (authenticationInformation, onDataCollectionScriptReady)
Call the 3DS data collection frame.
Method parameters
authenticationInformationobjectREQUIRED
The authenticationInformation object obtained from tokenData
onDataCollectionScriptReadyfunctionREQUIRED
A callback function called when the data collection frame is ready.
Showing 3DS challenge modal#
After a susccessfully call to checkoutAndPay then you should verify if the returned method at response has the threeDSInfo property. If afirmative, you should show the 3DS modal using this data.
open3dsModal (threeDSInfo, methodID, paymentKey, paymentCallback)
Mount the 3DS challenge modal.
Method parameters
threeDSInfoobjectREQUIRED
ThreeDSInfo object obtained as response of the calling to
checkoutAndPay method.
methodIDnumberREQUIRED
The payment method ID used to call the Tuna payment. This data is avaliable at the
checkoutAndPay result object at the methods property
paymentKeystringREQUIRED
The payment key generated by the Tuna payment proccess. This data is avaliable at the
checkoutAndPay result object at the paymentKey property
paymentCallbackfunctionREQUIRED
The callback function that will be called when the payment verification polling is finished.
Using QRCode Payment#
After a successfully call to checkoutAndPay using PIX or Bitcoin as payment method, you will have all necessary parameters to show the QR Code to the customers and then await for the payment confirmation.
useQrCodePayment (place, options, paymentCallback, group?)
Create an interface to show the QRCode of payments using PIX or Bitcoin as payment method. Additionally, create a long polling request responsible to check the payment status and call the callback function when the payment status changes.
Method parameters
placestringREQUIRED
The selector where the element will be mounted
optionsobjectREQUIRED
The object containing details and configurations about the payment.
paymentCallbackfunctionREQUIRED
The callback function that will be called when the payment verification polling is finished or throw an error.
groupstringOPTIONAL
The component's group name.
What's next?#
Once you have your account and your integration concluded, you can start the
setup up of your connections and flows in Console. For further details,
please check out the Console section.
